Tuesday, November 14, 2017

On Stage swaps - birthday cards

I had such a fabulous time at On Stage last week. There were 7 of us that traveled together.  I shared some  photos on Facebook of the fun we had.  I also shared some photos of Christmas swap cards I received.  Today I thought I would share some birthday swap cards.  I had to take these photos inside so the lighting isn't great.  I'll try to get photos of more swaps this weekend with some natural light.

Left: No name on this one
Right: Sarah Lythgoe from Gilbert, AZ

Left: Kasey Naue from Miami, FL
Right: Shannon Colon

Left: Geri Thode
Right: My good friend Patience Holt 

Left: Deb DeLillo from Rio Rancho, NM
Right: No name

Left: Tricia Bellingar from Bath, MI
Right: Laura Nigro from Overland Park, KS

Left: Cheryl Spears from Sulphur Springs, TX
Right: Natalie Sepulveda from Centennial, CO

Erica Cerwin


I've had so much fun looking at my swaps over and over again.  I'll share some more this weekend!

Wednesday, October 18, 2017

Stampin' Blends

Do you like coloring? Then you will love the new Stampin' Blends!  As a demonstrator, I was able to order these alcohol markers a month early.  So I've had a little time to play with them.  They are so fun!  Here are a few projects I made with them:


These will be available for you to purchase on Nov. 1st.  And even better, Stampin' Up is giving away 100 free sets!  Just comment on the Stampin' Up post I shared yesterday.  That will get you in the drawing.   Good luck!!

Tuesday, October 10, 2017

Merry Patterns

Only about a week left to get your name in the drawing for my extra Merry Patterns!  Here are a few cards I made with this fun set:


I love the deer in this set!  On this card I stamped
him twice - once in Crumb Cake & once in
Garden Green.  Then I cut both pieces out, trimming
off the head & legs on the green one to make a sweater.

I used Garden Green for the candles on this card.
The set comes with 2 different fillers for the 
candles.  That makes it easy to get this two-toned
look. I just stamped one set off and one set full strength.

It doesn't have to be just Christmas!


To get your name in the drawing, place an order of $30 or more by 10/18.  You can place an order online using hostess code VF4S3JZE or place an order at my pizza box class next Monday night.


Tuesday, October 3, 2017

Designer Series Paper bonanza!

Did you see the special going on right now for Designer Series Paper (DSP)? Buy 3 and get the 4th one free!

Here are the papers that are included in this special:

From the annual catalog - 

Be Merry (144111 - $11.00):

Birthday Memories (144118 - $11.00):

Coffee Break (144155 - $11.00):

Color Theory (144193 - $10.00):

Delightful Daisy (144137 - $11.00):


Just Add Color (144180 - $13.00):


Naturally Eclectic (144185 - $11.00):


Petal Garden (144168 - $10.00):


Pick a Pattern (144163 - $11.00):


Whole Lot of Lovely (144119 0 $11.00):


Wood Textures (144177 - $10.00):


From the Holiday Catalog:
Christmas Around the World (144629 - $11.00):


Painted Autumn (144613 - $11.00):

There are so many beautiful designs - it's hard to pick just 4!

Tuesday, September 26, 2017

Crafty Weekend

I was lucky enough to go to my upline Kay's retreat this past weekend.  This was the first time I've been able to go.  It was so much fun!  She spoiled us with lots of treats.  We had make and takes, lots of food and a Christmas pajama party Saturday night.

My goal was to get swaps done for On Stage in November.  I didn't get all of them done but I did get some completed. Here are some of the cards I made:
This stamp is from the Every Good Wish set. I love the 
watercolor look. I got 25 made for swaps!

I don't have this bundle yet but got to use Kay's. It's
a beautiful set - I've ordered it now! I only had enough paper
 to make about 12 of these for swaps. 


This card was made with the Snowflake Sentiments
bundle.  Another beautiful set!  I've seen so many
gorgeous examples on Pinterest with it.

I used several different sets on this card.
The sentiment is from the Snowflake Sentiments set,
the mittens are from the Smitten Mittens set and I used
the Winter Wonder embossing folder for the background.
I'm sure you can't see it in the photo, but I added Wink of
Stella to the embossed snowflake.

This is the Hearts Come Home bundle. More
Wink of Stella on the snowdrifts. I added
silver foil paper behind the windows.
I decided this was a little to time
intensive for swaps.

This is using a special stamp set - Merry Patterns.
You can get this stamp set free with a $300 party
or order.  Stay tuned for more info on another
way you can get one.

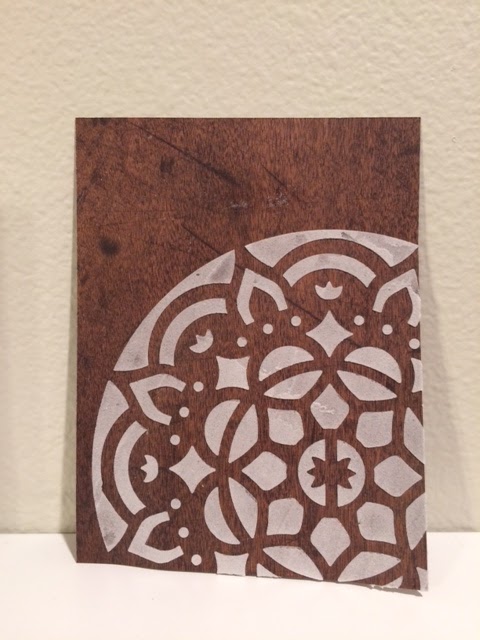
I wanted to make some swaps for On Stage
that weren't Christmas. This is using the
Oh So Eclectic bundle. I'm not sure this
is my final version. I'd like to try one using
embossing paste in the background instead of the
die cut out.

So that's most of what I made at the retreat.  Next time I'll have my cards planned out better so I can make sure I have everything I need.  But it was a lot of fun to play with stamps and dies that I didn't own!


Tuesday, September 19, 2017

Embossing Fun

Last night I had an embossing class.  We made cards using both types of embossing.  We had so much fun!  I forgot to take pictures at class but here are the projects we made:

For this card I used the Woodland Textures embossing folder - still one of my favorites.
I adhered it to the crumb cake piece before embossing so it would all match perfectly.
Then I added leaves using the Colorful Seasons bundle. I love those intricate die cuts.
Did\ you notice the little piece of fluff above the leaves? That is the copper ribbon all
 stretched out. f you pull it apart you end up with this really fun netting.

This card uses the Cheers to the Year stamp set. I embossed the circles on the 
background in gold and silver. I added a strip of the gorgeous Year of Cheer specialty 
designer series paper.  All of it has metallic foil - just beautiful!  The piece behind the 
sentiment is one of the foil snowflakes from the holiday catalog. I just punched the 
middle of it out with a 2" circle punch.  I'll  save the outside of it to use as a wreath on 
another card.

The card on the left is the card we made in class. It was made with the emboss resist
technique.  I stamped the snowflakes from the Colorful Seasons set in Versamark
on Shimmery White paper and them embossed them with clear embossing powder.
Then I took my aqua painter and Dapper Denim and applied a wash of color all over
 the card. The embossed areas resist the ink.  After that, I took my aqua painter and 
splattered drops of water on the card and blotted them with a towel. The water 
caused the ink to lift leaving little spots with less color.

The card on the right I sponged with Soft Sky, Marina Mist & Pacific Point. 
Sponging makes the colors a little softer.


Hope you enjoyed this peek at the fun class we had last night. Hope to see you at a class soon!


Tuesday, September 12, 2017

Not so scary cat punch

One of my favorite new bundles in the Holiday catalog is Spooky Cat.


Here are a few spooky projects I made with it:


But then I decided to make some not so spooky cards for my friend Elizabeth:


This card uses some of the Delightful Daisy Designer Series Paper.  
The sentiment is from the Wood Words set.

I used the Lovely Inside & Out bundle on this card.

Looks like I'm partial to black cats! The Happy Celebrations stamp set
& Celebrations Duo embossing folder work great together on this card.

The Painted Autumn Designer Series Paper doesn't have to 
be just for fall projects.

This would be a good card to send to
someone who recently lost their fur baby.

I had so much fun playing with this punch.  It's not just for spooky Halloween cats!

Tuesday, September 5, 2017

Mini pizza box fun!

I spent some time over this long weekend playing with new products.  I had more fun creating with the new pizza boxes!  They are food safe so perfect to give as a gift with a cookie or some candy inside.  Another great gift idea is to fill them with 3 x 3 cards - we now carry envelopes for those.  Those 3 x 3 cards would be perfect to use on gifts. I'm planning a class for this in October - watch my weekly email for details.   Here's what I created with them:

I sponged this pizza box with Pumpkin Pie ink.
I'm loving this new cat punch!


The boxes look great left white. I created a belly band for this one.
It slips off easily so the box can be opened.

There are so many possibilities for these pizza boxes!  I'm sure I'll be creating more fun projects soon!

Tuesday, August 29, 2017

Fun with Embossing Paste

I am officially an empty nester now.  We moved my youngest son to college 2 weeks ago. It's been very quiet around the house!  But on the bright side, I had time on Saturday to just sit & create.  It had been awhile since I took time to do that - it was so fun & relaxing.  I decided to play with my embossing paste.  I'd made 1 or 2 cards with it before.  This time I decided to try some new techniques.

Here's a photo of the tools I used:
Aren't those masks fun?!  I decided I wanted to make something with each one.

Here's the background I made using the clouds mask:
This was made using the embossing paste just as it comes out of the jar. I used a die cut oval in the middle to keep the clouds just on the outside. I knew I wanted to use the flying pig from the This Little Piggy set.  Here's the card I ended up with:
I stamped a few clouds in Soft Sky to go with my flying pig. The pig stamp has a saying at the bottom of it that I didn't want on this card.  So I put a piece of scotch tape over the saying when I inked up the stamp.  Just be sure you remove the tape before stamping on your paper! 

This background was also made with the embossing paste as it came out of the jar. But this time I put it on one of the gorgeous wood Designer Series papers:
I didn't want to cover up much of this beautiful design. So I used the cat punch from the new Holiday Catalog (available Sept 1st). I punched it out of Shimmery White card stock and colored it with an aqua painter to look like a Siamese - simple but elegant:


Then I decided to try coloring the embossing paste. I took a little bit and put it on my Silicone sheet and added a drop of Pumpkin Pie reinker:
I made this background and one that covered the whole piece of card stock.  This is the card I created with the piece that was fully covered:
This uses some new dies from the 2017 Holiday Catalog.  I just love this pumpkin die!

I've been wanting to try this next technique with the embossing paste.  For this one I used the brick mask.  Right after applying the embossing paste (after removing the mask), I sprinkled copper embossing powder on it.  I set it aside & let it dry for a little bit before heating it.  I didn't get a picture of the background by itself but this is the card I created:
I think this is my favorite!  I also used one of my favorite new sets - Painted Harvest.


I had so much fun spending the afternoon playing!  I need to make sure I do that more often.  I just got another fun bundle today from the Holiday Catalog.  I'll have more to share with you next week!